We have had interest from many people recently in our freestall design for our cows, due to the ease of cleaning, economy of bedding, and cleanliness of the cow.
Below, we will outline:
what a freestall is
why we prefer freestall bedding
other bedding options (including pros/cons)
detailed instructions including images & measurements to assist you in building your own freestalls
Bear in mind, we went from a 100 milking cow dairy down to a 4 milking cow homestead, so we will give various options for designs depending on your capacity. (And if you just want the how-to without all the commentary, skip to the bottom of this article for step-by-step directions.)
First, what is a freestall and why do we prefer them? A freestall is a type of “bed” for a cow to sleep on. Cows are free to come and go from the bed and it does not allow them to turn around, they must stand up and back out, which prevents them from soiling their bedding (meaning, a huge savings on bedding cost AND the cows stay very clean).
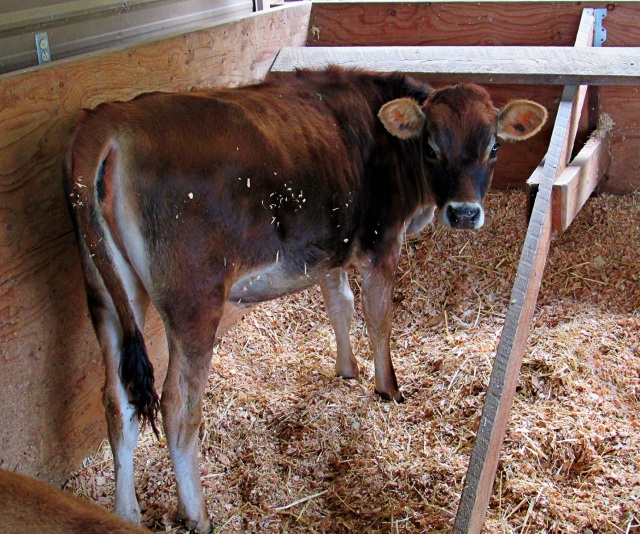
Nap time in a free stall (Proud Rose, with Martha in the background)
Even our heifers appreciate a nice dry comfy bed!
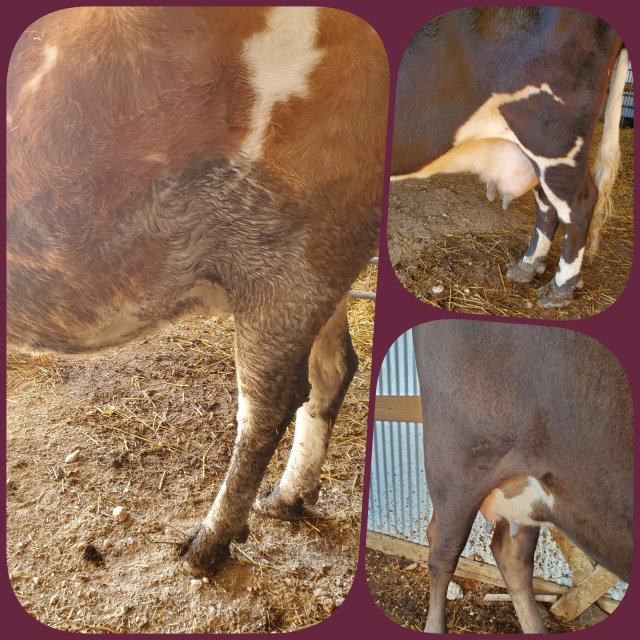
Below is a great example of the value of freestalls: The cow on the left has decided to be stubborn and not use the freestalls – not her overall dirty condition. The two cows on the right have gladly taken to the stalls – note not a speck of dirt on them!
A bit about the other styles of beds before we dig into freestall design:
Other types of “beds” include: tie stalls, box stalls, loafing sheds, or outside in the wild blue yonder. (Yes, I’m sure, there are probably more types of beds, but these are the main styles.)
Tie Stalls
Tie stalls: Individual stalls for cows like freestalls, except cows are tied into their stall by a neck strap and they are fed in the same stall. Tie stalls are generally found in the Eastern United States, where a lot of older style barns are still active as dairies. You may travel through Amish country in Pennsylvania and see lots of corn or alfalfa fields, but not many pasturing cows (considering the total number of cows in PA, only a small portion are actually pastured). That is because tie-stall cows tend to live in a barn the majority of their lives, are milked in their stalls, and most get access to a concrete or earthen exercise pad daily, weather permitting.
Tie stalls are divided into individual stalls with a neck strap on the cow that clips to a lower bar. Food is fed to the cows in the front of their stalls. This is the one benefit of a tie stall or stanchion: cows get fed where they sleep, a compact labor saving method, but not necessarily the “best” for cow health/longevity. The picture above does not show very well, but there is actually a thick rubber “mattress” that gives the cows cushion over the concrete base. A thin coat of shavings is added to suck up any moisture and provide some additional comfort. Behind the cows is a grate about a foot wide that allows their manure and urine to drop through. A pulley system and water flushes the ditch regularly, limiting the need for manual labor for cleaning.
Negatives to tie-stall design: Cows are locked in, limiting their ability to move freely. They can get sores on their hocks from rubbing on the mattresses and on their upper neck from rubbing on the neck bar while eating. The pads are mostly level, and cows actually prefer to sleep and stand with their front end elevated.
Box Stalls
Box stalls: designed for “special show cows” or elderly cows or as maternity pens. They are very labor intensive, which is why they are NOT popular for everyday use.Good box stalls are at least 12′ x 12′ in dimension (smaller can make do, but are not as practical). They are a dirt or concrete and are a thick (one foot or more) shavings bed or a pack of layered shavings and straw. Straw is less desirable for cows because it tends to not cover manure very well and when cows lie down, they get messier. Straw is better for when a calf is born because the shavings stick to a wet calf whereas the straw provides a nice cushion and can be used to wipe off fluids after birth or poke the calf’s nose to get it breathing. Shavings or straw are continually added and the stalls tend to be deep-cleaned infrequently. (They keep adding shavings to keep the pen dry, until it builds up too high or gets too moisture bound, then they are dug down to the base by pitchfork or tractor and started over.)
We maintain one box stall for calving, which is appropriate to the size of our small herd. Ours is about 10′ x 10′ and is only bedded in preparation for an upcoming calving. The rest of the year = straw and wheel barrow storage area. I’d love to have it a litter larger, but that’s what fit the area…
Loafing shed aka group housing with stanchion feeders on right
Loafing Sheds are similar to box stalls, but house multiple cows. Many cows live in loafing sheds and their designs vary from bare earth to straw bedding to composted bedding that is rototilled daily! Talk about labor! They poop and pee all over the stall (because as you soon learn, cows are more like pigs than pigs). Luckily heifers are little and don’t have to be milked, but when you start getting cows in this type of environment, they end up laying in their manure and it’s a nightmare trying to keep them clean and avoid mastitis.
We have visited a few farms that use loafing sheds and the only one I could see as practical was the composted bedding. Again, lots of labor, but the cows were giant Holsteins and the thick fluffy composted bedding was very soft and cushiony for their large frames (plus the composting action of the bacteria actually makes the bedding safer).
Another farm we toured, a father and son operated together. The father loved loafing sheds but the son went to a dairy college and learned about freestalls. They both insisted the cows preferred the style they (the humans) did. On our visit, we observed one cow in the loafing shed and several in the freestalls.
Why do people use loafing sheds? They are very easy to build. using an existing building or putting up a open shed with a roof is simple and cheap, and they are adaptable to the number of cows you need to house. On the negative side, you end up spending a fortune in time (cleaning) and bedding (replacing daily).
Cows love to be outside in sunshine and when grass is green. In bad weather, we protect them by offering a barn with freestalls and an exercise area outside.
In the Environment: Some people keep their cows outside year-round, we recommend for dairy cows to be outside only in good weather/seasons. I grew up with beef cattle only, and they always lived outside under trees (fairly happily, except for a few times when the weather was very cold or wet). When I became a “dairy” cattle person, I quickly learned how different dairy are from beef.Granted, no udder should be laying in a wet damp mess. But compound that a dairy cow has soft teats for hand or machine milking combined with a larger udder, much higher production and a body that is built to work off all the outer fat from her body….this creates an animal that demands a higher quality of care if you want to keep her around for many years.
Do our dairy cows prefer to be outside in good weather? Absolutely! Is it healthier for them? Without a doubt!
Do our dairy cows always prefer to be outside? No. When the rains come and the snow falls and there’s no safe dry place to sleep, the “cows come running home”… We joke that we can predict weather based on just watching the cows. If they are outside, you’re pretty safe the weather will be decent. If they are in the field and suddenly all come running home, you can bet either the flies started to bite or a hail storm is imminent! If they’re snug in their stalls, snuggled up around all the straw they can find – you better wear your insulated Carhartts!
BUILDING D-I-Y FREE STALLS 101
Our home-made version of freestalls designed by genius husband Jay! (Note, to right of picture is a broom end attached to a post – the cows LOVE to be able to rub up against brushes!)
Before building freestall(s), consider placement of the stalls to protect them from wind. While ventilation is very important in a barn, protection from wind (and wind that blows in wet weather such as rain or snow) is equally important.
While living on the large dairy, we used the best in freestall design, the majority of our milk cows slept in lunge-style freestalls which are designed to allow a cow to lunge forward and gain momentum to stand up, like she would naturally. You can see in the picture below that style of freestall, which is narrower toward the outside section (you don’t want the cows crawling through the freestalls, and some would if given a chance) and wider toward the head of the stall, allowing for the cow to lay comfortably and stand up easily.
All of our heifers live in free-stalls once they reach about 5 months of age (talk about easy cleaning!). We “teach” them by putting a flake of hay in the front of the stall. As they get comfortable eating in the stall, they soon learn that sleeping there is really nice, too. Once they’ve learned, we stop feeding them in the stalls as it is a bit messy.
By the time they become milk cows, they are already pros at living in a freestall environment. This means one less stressor in their lives when so many changes are taking place. The only problem seems to be that first-fresheners tend to be smaller and not full-sized yet, and so they can sneakily turn around and lay backwards. Oh well, eventually they can’t do that as the grow. 🙂
In this next picture (below), you can somewhat see (behind our beautiful Zellie cow) a “neck bar” which is placed on the top of the freestall and back a distance which encourages the cow to back up when she stands (because the neck bar essentially gets in the way of her standing comfortably in her stall, the cow feels like she is “ducking down”). The idea is that she will back up just enough to either stand on the curb or step behind the curb, then go to the bathroom in the alley. There are additional bars and supports that can be added to a free stall design depending on the style you go with and you can read further on those added benefits if you click on the reference links below. For our purposes on our farm, the two main important pieces are the neck bar and the curb. (****Cheater note: If you immediately throw hay into the feed bunk before the cows wake up, they will jump up and head straight for the feed and forget they like to poo immediately after waking!)
When we moved to our small homestead, we brought along a few freestalls from the big farm. But somewhere along the way I think the brackets all got used for repair in the big barn, because our bucket of brackets was missing. My husband searched online and contacted dealers, but the expense of official brackets (or custom making new ones) was cost prohibitive for us at the time. So our fancy freestalls sit in the hay barn awaiting the day we might have the money or ingenuity to put them up.
The main dividers for fancy freestalls
Thinking instead like a (poor) 20th century rural homesteader, we set out to design our own stalls.
Criteria being: that they would be functional, that the cows might actually use them, and that they would not cause injury to the cows in use.
In this photo, little Zelie the namesake of the grandmother cow in the picture a couple above this picture is being born in our future freestall area, before the dividers had been put in.
As you can probably tell, we love our spoiled cows!
Dimensions:
We started with the basic framework. Because our new home was in a part of the world where snow falls straight down and we get wind only with the changing of the seasons (literally, only a few days per year) we decided to go with an open barn design. This means, we did NOT build solid walls around the barn (see photo of Zelie being born, above). When we moved in, there was a 24×48 shop attached to a 24×48 covered roof area with open sides. The enclosed shop is where we keep our tools, grain, semen tank, and the majority of our hay supply. The open barn area is where our cows live and eat.
Picture this: Four main corner beams, supports, a sloped metal roof, sides up 4 feet for framework for box stall, free stalls, and feeder. Open air from 4′ to roof line. Ventilation is super important for animals!
Proud Rose hangin’ out in the exercise area attached to the barn.
The only modifications we made in the actual function of our barn (above) is that to the left of the hay rack we put in a water trough with heater during the winter months and to the right we put in a permanent box for free choice minerals and salt. The gates actually lead to an outside paddock for the cows to use in the winter months when they are housebound, or as a lay area in the summer if they’ve been brought in due to heat or inclement weather. There is a feeder that my husband designed for outside use that keeps the cows eating outside when they can (which keeps the freestall barn drier and cleaner).
STEP BY STEP DESIGN OF FREESTALLS:
Built a four foot wall using plywood sheets and poles (preferably treated or rot-resistant, friends of ours used Juniper and Cedar, we used peeler cores). Length depends on the number of stalls you need (one or more stalls) and space within the building. See below for dimensions.
Dig a hole to secure peeled log(s) for the curb to hold in bedding. Cut to the full length of the freestalls, half above ground, half under ground. Our log is about 1 ft. in diameter, so the cows step down about 6 inches. They learn how to do this safely out of habit.
Insert stall dividers at increments suitable to your cow(s) frames. See appendix below for specific dimensions by breed and size. Secure at top and at log curb. Secure additionally with braces.
Dig behind the entire length of the log curb: a 1 foot wide section about 3-6 inches below dirt level . Back-fill with washed gravel for drainage. Trust us, even for the little amount that some moisture does get in stalls, this drainage is very effective!
Level the base dirt in the stalls, and then added more dirt to the head of the stall to give the base a slope, for both moisture runoff towards the drain (say, if a cow backed in and peed in the stall) and to simulate an upward slope, since cows like to sleep with their front ends higher than their rump.
Add neck bar to dividers, about one foot out from the top of the dividers. You might want to put these in loosely and then watch your cows use the stalls for a while and adjust before putting them in permanently.
Top dress stalls with a thick bed of shavings, maintaining a slope from head to base. Several options at this point for bedding material:
Build up withdirt, then put a layer of sand maybe 2-4 inches deep on top of the dirt before you (optionally) bed with shavings. Be aware sand = in your manure handling/compost. Essentially, do you want (& can your equipment handle) sand added to your fertilizer?
Sand drains better and is very comfortable, but you have to purchase the sand and the sand is very unstable in that it is so soft it is hard to keep the sand in place, whereas dirt stays right where you put it.Sand can be used for the entire base, but plan to spend more time adjusting bedding at working to keep the slope in place. Studies indicate cows prefer sleeping on straw or rubber over sand, so even if you use sand for comfort and drainage, consider still topping with shavings.
You could also use rubber mattresses on top of the dirt, but I would recommend only using the rubber on the upper half or 2/3rds of the bed (toward the front end of the cow as she is sleeping) because the end is more likely to get soiled and the rubber prevents drainage.
Concrete is a possibility, but is expensive and unforgiving (you better like your stalls exactly as they are, because you’re not easily moving concrete once set!) Concrete is what is used for tie stalls or stanchions, then they are topped with rubber mats or shavings. Cows are very heavy animals, and they tend to wear rubber pads down unevenly, causing bubbling or waves. With shavings, cows will sink down to the concrete layer and the body parts with pressure points will tend to rub and cause callouses that irritate the cow.
I like to remember what my dad once said to me, “If you wouldn’t like it, why do you think they would?” I do not like sleeping on the floor, but a bed of shavings would be delightful (or, say, a wool mattress would be the human equivalent). From there, work out what makes both you and the cow happy – the comfort & cleanliness balance.
APPENDIX A: Dimensions
Determining freestall dimensions based on the needs of YOUR cow:
If you have multiple cows, base your framework either on the size of your larger animal(s) OR consider customizing stalls to fit various sizes OR divide housing by animal size. Our length is the same for our whole herd, but the width of stalls vary so that our larger Jerseys have a little more room to lay than the smaller ones. The cows tend to each find a “favorite” stall and stick to it. Heifers are in a separate barn with smaller freestalls to “learn” in.
Useful measurements of your cow(s) are:
rump height (measure from base of rear leg up to the backbone, you can use a ruler or level to get an accurate measurement)
hook bone width (the front bones of a cows hips, width from outside of one bump to outside of the other)
nose-to-tail length
imprint width (when a cow is laying down, it’s the measurement from the belly on one side to the hock or hoof on the other side, to get an idea how much room a cow needs to lay comfortably on width)
lunge space = approx. 22% of resting nose-to-tail length (meaning, you can not make a stall only the length of a cow laying down, it must provide room for her to “lunge” or move forward in motion to stand up.
For custom design, consider these calculations:
Stall length from curb to solid front = Rump height x 2
Stall width (from center of divider) = Hook bone width x 2
Ta-da! We did it!
The above picture is a view of our freestalls and alley from the maternity box stall (aka straw storage in off season) and to the right is the water trough for winter use (the barn has lighting and electricity, making it much easier to heat water from here than from an outer paddock). Next to the trough is the hay feeder, then the mineral feeder, then a gate to the outdoor exercise area and the exit gate where the cows head out to be milked.
Observe the cows once your project is complete:
Are they using the stalls?
Do you notice any cuts or sores that they may be getting from some aspect of the stalls?
Is your bedding working correctly?
Other advice and tips:
Clean stalls daily and refresh shavings as needed. Our cows tend to not use the stalls during the day (except they like to step up their front feet into the stalls so they can stand high while cudding). A thorough morning cleaning and leveling keeps the stalls in top condition and your cows spic-and-span!
If the stall length is mismatched to the cows, maybe a bit too long or one of your cows is smaller (or older, like my old gal, she likes to poo while laying down sometimes rather than stand up…) you may have to scrape out the bedding in the end of the stall, down to the gravel. Top off again with fresh shavings. This should stay dry again a month or more.
Come summer when the cows are out to pasture, we scrape out the barn down to the dirt and gravel, let dry, then sprinkle Diatomaceous Earth across the ground and let it “cure” all summer with sunshine and air. In late fall, re-bed thickly in preparation for winter housing.
The WIDER the stall, the more likely the cow will use the stall, and the more likely the bedding will get soiled. Try to find that happy medium.
It is best to train heifers how to use (small versions of) freestalls, so that they are pros when the become cows. Training a mature cow to take to a freestall can be difficult, and may require that you tie her in the stall each night to teach her “here is your bed”. Some take to it instantly, others are very slow learners. One I had that was not taught as a heifer refused to sleep correctly, she will back in and lay with her head sticking out. Quite hilarious, but we allowed it because she is a rare high class cow that doesn’t like to be dirty!
Occasionally, someone thinks the RULES don’t APPLY to THEM!!! (Bad Rosie!)Example of a “homemade” freestall barn created for beef cows. As long as the bedding is kept full, the cows use these stalls every day during the winter and often during the summer, too.
If you are going to go all-out with store bought freestalls, I recommend reading the links below of studies conducted by various universities as to the best designs and dimensions for freestalls:
If you still have questions, I encourage you to scroll back through the photos for ideas and clarification. If your question is still not answered, feel free to ask it as a comment (below) or email us directly. We respond to all emails and comments, so if you do not hear back from us, we have not received your message, try again!
We are just building our barn. Concrete is poured, milking stanchion area is designed. I will have (2) 12×12 stalls for my 2 cows. One for storage until calf is due. The other 12×12 I’d like 2 free stalls, and a hay manager. Can I do it? 7′ free stalls..I’m trying to play with layouts.
I don’t think you could fit 2 freestalls plus a hay manger in a 12×12 space. Placing the stalls and feeder on opposite ends, the cows would be eating and going to the bathroom in the stall, as the space would be too narrow. If you could increase the area to 12 x 14 or greater, then you could probably fit them both!
I came to that conclusion. Since it’s in progress and the walls will be stock panels.. it is now 16 x 12. The 12 is a fixed measurement to keep center aisle open. If you draw a 12×16. The in from outside door is fixed at the lower left corner of it. I’d figured a 50″x10′ for my Guernsey and a 44″x7′ for the jersey. Plus I need my hay manager. Can you sketch and take pic of your suggestion? I’m still trying to .. as you say, not have them eating and pooping in the freestall.


 The only modifications we made in the actual function of our barn (above) is that to the left of the hay rack we put in a water trough with heater during the winter months and to the right we put in a permanent box for free choice minerals and salt. The gates actually lead to an outside paddock for the cows to use in the winter months when they are housebound, or as a lay area in the summer if they’ve been brought in due to heat or inclement weather. There is a feeder that my husband designed for outside use that keeps the cows eating outside when they can (which keeps the freestall barn drier and cleaner).


Would this set up work for milk sharing with a calf (morning only milking)?
if so, where would you recommend putting the calf at night?
LikeLike
Yes, you can either have a second stall the calf can lay in or most people separate the calf into its own pen at night and milk in the AM.
LikeLike
great article thanks for sharing so much info!
Like
LikeLike
We are just building our barn. Concrete is poured, milking stanchion area is designed. I will have (2) 12×12 stalls for my 2 cows. One for storage until calf is due. The other 12×12 I’d like 2 free stalls, and a hay manager. Can I do it? 7′ free stalls..I’m trying to play with layouts.
LikeLike
I don’t think you could fit 2 freestalls plus a hay manger in a 12×12 space. Placing the stalls and feeder on opposite ends, the cows would be eating and going to the bathroom in the stall, as the space would be too narrow. If you could increase the area to 12 x 14 or greater, then you could probably fit them both!
LikeLike
I came to that conclusion. Since it’s in progress and the walls will be stock panels.. it is now 16 x 12. The 12 is a fixed measurement to keep center aisle open. If you draw a 12×16. The in from outside door is fixed at the lower left corner of it. I’d figured a 50″x10′ for my Guernsey and a 44″x7′ for the jersey. Plus I need my hay manager. Can you sketch and take pic of your suggestion? I’m still trying to .. as you say, not have them eating and pooping in the freestall.
LikeLike
Love this! So much info. Thanks so much for sharing !
LikeLike
great article thanks for sharing so much info!
LikeLike