
Tricks and Tips to Making Consistently Good Butter
 (Principles and Practice of Buttermaking, McKay and Larsen, 1911.)
For a copy of our FREE buttermaking book, click the photo below for a PDF copy!
 The definition (components) of butter:
- Fat = 84% (80% or higher)
- Water = 13% (range 6 to 18%)
- Protein/sugar = 1% (range .5 to 4%)
- Salt and mineral = 2% (average 2%, as added)
The ideal butter is:
- Made from thick cream
- Churned at 50-60 degrees F (as warm as possible, yet forming to granules/flakes, not a lump)
- Churns into evenly-sized flaky texture
- Washed thoroughly
- Worked clean
- Containing enough moisture as to remain pliable/workable
- Uniform in color & body
- Salt evenly distributed
- Tastes: clean, sweet, fresh, rich, mild
- Smells: pleasant, delicate, mild
Steps to Successful Buttermaking
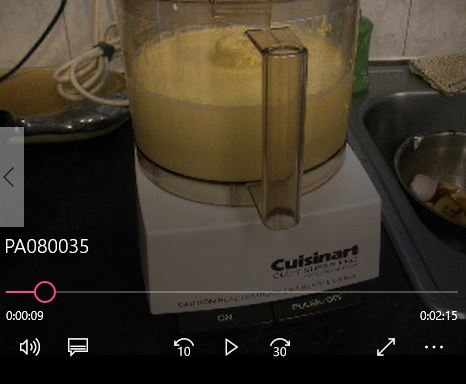
 For the cleanest, freshest-tasting butter, try making it in a food processor or mixer.

Alternative options for a “churn” are:
- Mixer – A KitchenAid style stand mixer or a hand mixer both work similar to how a food processor works. A tip – start with a whisk attachment until the cream has become thickly whipped cream, then switch to the flat beater to finish.
- Blender – An economical option for someone making butter only occasionally. Fast, but globs the butter into one lump making it difficult to clean properly.
- Old fashioned churn – Fun, but can be very slow to turn to butter and beware many old models are no longer food safe.
- Ice cream machine or bucket with lid and drill – Makes butter in bulk, but difficult to tell exact point when butter is done if using a lid. Is a cheap alternative to a commercial butter making machine. Can also use without lid – so you can see better what you’re doing, but you may want to cover partially with a towel to keep down splatter.
- Electric ice cream mixer – I tried this once, thinking back how every time I made ice cream, the ice cream seemed to turn to half butter. No-go. I “churned” for upwards of 40 minutes with absolutely no change in the cream.

Fill Quisinart 1/3 full (which is about 1 quart of heavy cream for mine)
TRICK: Freeze cream before churning to speed the process. Normally, fresh cream takes 10 minutes to “break” into butter. Frozen and thawed cream takes under 2 minutes. If we only have small amounts of extra cream, I’ll add to the jar in the freezer and wait until the jar is full to thaw the cream for churning.
Turn ON and let churn for 2-10 minutes (see photos below) until separated into butter granules and buttermilk:


Once butter is developed, pour into a wire mesh strainer over the sink (with a jar underneath if you want to save the yummy buttermilk).

Rinse with cold water (same temperature of butter, around 50-60 degrees F)

Until the wash water coming out the bottom is clear
 Work out any remaining water.
 There should be no whey coming out – any excess moisture should be clear water
 Add ingredients, if desired
 Blend in ingredients by folding and kneading, then shape into a form. Note, if you add ingredients such as fresh garlic or honey (“wet” ingredients), there may be some sticky “seepage” out the butter, as the water and oils do not always blend well.
 For storage, I have found that I best like waxed paper. Also, I cut the butter into individual sized pieces, wrap the whole block, and put it in a plastic bag with other butters like it and store in the freezer until use. Note – garlic is very powerful and if left in the fridge outside of a bag, it can and will contaminate your other food with garlic odor – we learned that with whipped cream we had in the fridge. Garlic whipped cream on our hot chocolate was….not yummy!!
 Investment of wood or silicone butter molds and stamps can help dress up your butter further:

If you’re adventurous, there are a number of ways to fancy up butter – I like the book: Recipes from the Dairy, published by the National Trust in Britain.
 You can also come up with your own recipes:


Happy buttermaking!
For technical help and more detailed, exact instructions for the steps of buttermaking, see below:

Conditions Affecting the Churnability of Butter
The main factor in churnability is: Temperature
Troubleshooting
Problem: Cause: Solution:
| Butter comes out in a soft lump and is very greasy | Temperature of cream during churning is too high | Start with cream at a lower temperature (40-50 degrees). Look for evenly-sized flakes or granular balls rather than one lump.Make sure churn is around 1/3 full of cream (if not enough cream, the air will warm up the small amount of cream too much during churning). |
| No matter how long the butter is worked, there is still a lot of buttermilk left in the finished product | Temperature of cream to high, causing buttermilk to incorporate into butter rather than separate out | See above, pour from churn into wire mesh strainer and gently wash back and forth at a cold enough temperature to remain granular. Wash until water comes out bottom clear. |
| Butter sours quickly after being made | Too much of non-fat portions of the cream are left in the butter after being washed/worked or too little salt applied. | Wash thoroughly, work thoroughly (there should be no buttermilk excreting out from the worked butter). Spread worked butter out flat, evenly salt, and incorporate by kneading. Can also lay out flat on wax paper, cut into 1T pieces, wrapped, and kept in freezer up to several months. Only keep out what is used in a day or two. Can also pre-culture cream to produce a “cultured” butter which has a stronger taste. |
| The cream churns forever before turning to butter | Cream too cold or too light or too much cream in churn or cream from unhealthy animal | Let the cream warm up a bit (50-60 degrees) before churning. This can be done by leaving the jar out of the fridge for a few minutes before churning.If using thin cream, try to use thicker cream via cream separator or by only skimming the top half of the cream off the container for butter (use the bottom light cream for your coffee). Or, double skim by skimming a large amount, then letting the cream set another day in the fridge, then skimming the cream and using the top 2/3 for butter and the bottom 1/3 for other use.Fill the churn about 1/3 full for maximum agitation – to speed up the quickness of turning to butter.If the cow is very late lactation or possibly sub-clinical mastitis, cream may not churn. Check for signs of excessive yeast (bubbly, ferment-y milk) or bacteria (CMT or SCC, or culture test). |
| The cream turns quickly to butter, but a lot of cream is left in the churn. | Cream too thick | Use a thinner cream, as super-thick cream will stick to the walls/paddles and will not agitate, therefore will not transform to butter. |
| The butter is rock-hard and very un-workable (hard to incorporate salt | Cream too cold, making the butter very hard and excreting out a larger portion of the liquid. | Warm cream to ideal temperature before churning (you probably dumped the cream in straight out of the fridge, right? Next time let it set out for a while first).Or, call this “super butter” and charge more for it since the butterfat content is higher! |
| There are white curd-like particles in the butter | Cream aged too long | If this happens, wash the butter several times to remove the white particles. It can be salvaged.Next time, use fresher cream, as over-aged cream will become acidified to curd form and the curd will incorporate into the butter, causing defect (causing the butter to go rancid quickly). |
| The cream solidifies and is not agitated, so butter does not form | Cream is too thick | Add light cream, milk, or water to thin the cream and produce agitation. |
In summary: “The lower the temperature at which the churning can be successfully accomplished, the more complete will be the churning; that is, the less fat will remain in the buttermilk.” (McKay & Larsen, pg. 231.)
Other Factors Affecting the Churnability of Butter:
- Season –
- Spring (early pasture season) > Softer Fat > Churn at a cooler temperature
- Winter (dry hay season) > Harder Fat > Churn at a warmer temperature
- Breed –
- Jersey cattle tend to have the largest (softest) fat globules > Churn at a cooler temperature
- Holstein cattle tend to have the smallest (hardest) fat globules > Churn at a warmer temperature
- Other breeds of dairy tend to be in between those extremes
- Lactation –
- Fresh cows have the largest (softest) fat globules > Churn at a cooler temperature
- Late-lactation cows have the smallest (hardest) fat globules > Churn at a warmer temperature & make sure cream is thick
- Type of feed –
- Some feeds (such as cottonseed & by-products) give butter a “crumbly, tallowy, hard condition”
- Succulent foods tend to make softer butter
- Type of churn –
- Dash or barrel style churns – very slow in forming butter. Not generally used (or found in useable condition )today.
- Dazy hand-churns – can work, but works best only with “ideal” churning butter. No noise.
- Blender – Makes quick butter, but the fat tends to glob together on the blade and sink, forming one lump that is very difficult to clean properly. Also very high noise.
- Food processor – The best choice in making speedy granular (cleanable) butter. Noise is minimal, and only takes 10-15 minutes max.
- A homemade churn can be made using a square bucket (assists agitation) with a lid (prevents splashing) and a long handled wooden spoon or metal paddle that can fit into the head of a drill and tightened down. (A hole is put in the lid, slide arm of paddle through the hole, put lid on bucket, attach drill, and turn on.). This can make a large amount of butter at one time and is effective. Operator has to hold the drill the whole time and stop to check occasionally.
When to know to stop churning:
- Size of granule similar to the size of a kernel of wheat or a flake the size of a kernel of corn.
- Bluish tint to buttermilk
- Butter raised higher above buttermilk
Why care about when to stop churning? If churning ceases too soon, much fat is lost to the buttermilk. If over-churned, the butter will contain too much buttermilk and be very difficult to wash clean.
Cleaning the churn:
First, rinse with lukewarm water. Wash thoroughly with soapy water. Rinse with lukewarm water. Rinse again with scalding hot water. Dry completely. If sour smells remain, sanitize the equipment by wiping or spraying on vinegar. Let set a few hours, then rinse off with hot water and dry completely. (For wooden churns, McKay and Larsen recommend food grade lime in a liquid solution to be put in the churn. Swish around and let set until next use. Before using again, rinse out lime.)
Washing the butter:
Butter should be washed 1 to 4 times at a similar temperature to churning temperature. Extreme changes in temperature should be avoided. Use only clean water sources.
How much salt to add?
- Salt is added to butter to help remove buttermilk, increase length of preservation, and adds additional flavor that most people are familiar with.
- One-half to 1.5 ounces of plain white salt per pound of butterfat is generally suitable. A study indicated that Americans prefer butter with a salt content of 2.5%.
- If you prefer unsalted butter: please keep the butter frozen until use!
- Butter should be formed into large granules before salt is added.
- When to add more salt: Use a higher amount of salt if the butter is high-moisture. If the butter is worked a lot, more salt should be added as some will be lost in “brine” form as moisture drips out of the worked butter. Hard granular butter may need more salt, as it does not easily incorporate. Older or poor quality butter may require more salt to help preservation.
- When to add less salt: Soft greasy butter readily attracts salt, so less should be added. Clean, fresh butter requires little salt (you don’t want to mask the butter flavor!)
Add anything else?
- Herbs, seasonings, and flavored salts can make butter unique.
- Some of our favorite blends are “Sicilian Family Blend” – fresh Garlic & ground Rosemary; “Hot Pepper” – Cayenne, Jalapeno, and Turmeric; Honey butter (30-50% honey); and Cinnamon, Vanilla, Cardamom Honey Butter.
- A fun book with some wild “Savoury” butters is: Recipes from the Dairy by Robin Weir and Caroline Liddell with Peter Brears, published by the National Trust (Britain).
Working the butter:
- Butter should be worked (or kneaded) 10-15 times to fully incorporate salt and expel excess water (if any). Soft butter works faster, hard butter may need to be worked longer.
- When the “Principles and Practices of Buttermaking” was printed in 1911, the government standard for butter included a limit of 16% water in the final product.


I am new to butter churning and have been successful doing it till this summer. I discovered that if the cream is too warm it won’t produce butter. Lesson learned! My question is, is there any uses for my over churned butter?
LikeLike
You could melt it and turn it into clarified butter. You could freeze it and pull out a daily amount as a whipped butter. The high moisture content just means it won’t bake the same and won’t last long on the counter.
LikeLike
Michelle, thanks for pointing me to this blog post. It helped me immensely in my first butter making experience! The food processor did the trick quite well, while the immersion blender was taking too long and I worried about overheating the immersion blender’s motor. It would have been nice to do a gallon all as one batch but I was able to find other things to keep me busy while waiting for the food processor to churn each batch. Best butter I ever tasted… thanks for all the great tips!
LikeLike
Glad to hear! Thanks for getting back to me about the immersion blender. Now I won’t try it. 🙂 Enjoy your fresh butter, there’s nothing better!
LikeLike