
(It’s EASY, really!!)
My first foray into Surge milkers came by chance, when Jay and I attended Whatcom County’s yearly farm auction. I had my eye on some milk cans and old bottles and crates, looking to set up my own equipment/dairy. As we were looking around, Jay introduced me to a neighbor and we explained to him why we were at the auction. He said, “I’ve got some old buckets and things, haven’t been used in 14 years, but if you think they’d be helpful I’ll bring them over to your farm.” Not knowing what he really meant, I said, “Sure, that’s very nice of you.”
About a week later, a tractor drives into the farm and Jay saw the bucket of his tractor piled up with equipment. It was our neighbor coming over with the equipment. They unloaded everything into the garage; the neighbor said basically “good luck” and was very happy that someone might be able to use the equipment. When I arrived, what I saw was an original Surge milk pump, 3 Surge belly milkers, a Farm Master milking machine, a Surcingle, and a stainless steel strainer. We jumped into the truck and headed over to DariTech to see if Bryan could help us out. When the average dairy farm in Washington state averages 400 or more milking cows, I doubt he had much experience with people wanting to milk by belly milkers. He tested them out and said that two worked, two didn’t. One was an old “Farm Master” and I never tried to get it working. The other unit, though, I was not ready to give up on. So, I found Hamby Dairy Supply and called up the nice family business in Wisconsin and they helped me get everything I needed. When I got the supplies, I was able to rebuild all my pulsators and had three fully functioning machines. Since then, I have found some more machines at auction to fix up and I’ve never been disappointed. Some people think they need two machines. It’s nice, but not necessary.
First, you should purchase a “rebuild kit” which costs $10-12 and includes:
- 2 leather strips
- 4 leather disks
- 4 tin disk “expanders”
- 1 leather ring (some versions do not include this, so save your old one!)
- 1 small “O” ring (For C style lid only)
- rubber cap for the check valve
Hamby Dairy Supply has a great diagram of where all the parts of a pulsator should be placed. They are the source I recommend for purchasing Surge equipment: hambydairysupply.com/xcart/manuals/surge%20pulsator.pdf
You can attempt to clean your old pulsator and rebuild using its own parts – I have successful done this. But, I do recommend at least keeping a spare kit around just in case something breaks, goes missing during cleaning, etc. The kit includes only the parts that can wear out and deteriorate over time.
 Check Valve Tip: If you have a check valve and the rubber is getting old, you probably have the old style. You can tell this way: OLD = you can grab the rubber and unscrew it and there is a screw attached to the rubber part. NEW = The rubber pops on and off, no screw. The TIP is, they say you have to buy a new check valve if your old style wears out because they don’t sell the screw top kind any more BUT if you scrape/cut off the old rubber, you can slip the new rubber over the top and it works just fine!
 Optional purchases: The only other wearable part that comes on a Surge machine is the gasket (goes underneath the lid, suction from the milk pump seals the lid to the tank.) Inspect yours. If they are at all dried, cracked, or worn, I would suggest buying a new one. A cheap version of the gasket is only about $5 and a name brand one (they’re about 50% thicker) is $15.
Where to buy the rebuild kit:
- Each kit SHOULD come with paperwork showing you how to put all the pieces together and clean the machine:
- Hamby Dairy Supply www.hambydairy.com
- http://www.surgemilker.com/instructions.html
- Parts Department www.partsdeptonline.com
- Portable Milkers www.portablemilkers.com
- Fisher and Thompson/WestfaliaSurge/other dairy supply stores
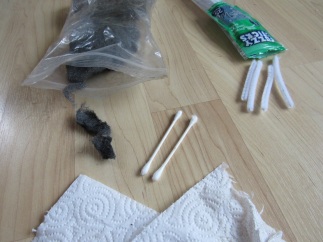
Helpful Tools:
- Small flathead screwdriver
- Steel Wool
- Sandpaper (very fine grade)
- Gloves
- Rags/paper towels
- Newspaper
- Pipe Cleaner (from craft aisle)
- Q-Tips
Instructions:
- Lay out newspaper on a flat surface, collect all your tools, and get ready to get dirty! (Old pulsators I’ve rebuilt have been known to be caked with dirt, grease, and dead insects.)
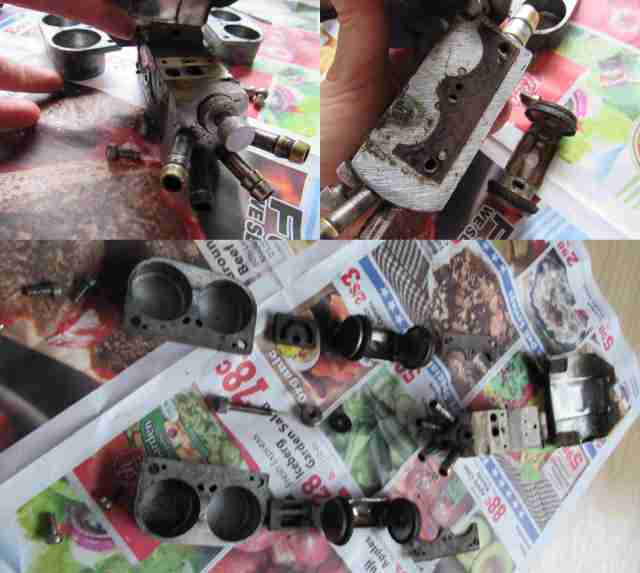
 Start by removing the four screws on the sides of the pulsator. Note: there is a large fifth screw on the bottom of the pulsator, a little smaller than a dime in size. Never try to adjust this screw! (In the picture, the arrow is pointing to the screw you do NOT want to touch.)
- Pull outward with the sides and they should slide off. They may be stuck, so you might have to wiggle them back and forth until they slide off.
- Use the small screwdriver to push out and remove the little rod holding on the lid. This can get loose and fall off when the sides are off, so it’s best to just take it off and set it aside while you are working.
 The two sliders each have two screws on the inside. Remove those screws. Take apart the pieces and you should have an old leather disk, a tin disk, a metal disk, and a screw. Put back together, but with a new leather disk and tin disk. There may be a disk inside the old leather that is a thin tin disk that looks like a sun. I always like to clean and put that disk in the new leather. Reassemble each side.

Note in the above photo on the left, there is a leather with a sun-shaped disk inside it (this sun-disk is found in older pulsators but does not come in a rebuild kit…) the other disk in that picture is the solid one that does come with the rebuild kit. With experience, I’ve learned to KEEP the sun-disk in addition to the solid disk. Why? Because the spikes on the sun-disk help keep the leather expanded properly so that air flows through the pulsator accurately. If your pulsator does not have this disk, it’s ok – just do like I’m doing in the picture on the right: flex the leather pieces before you place them back together.
- On the main base, remove the long leather strips. After cleaning all the outside parts, use a pipe cleaner to push up into each tiny hole to remove any dirt. Some holes go through to the other side, some curve, so just try to clean and tap out any gunk you can get to. You can put it up to the light to see if the holes are opened. Put on the new leather strips.
 Remove the pin from the main base of the pulsator. Clean the leather disk or replace with a new disk. Put the pin back in.
- Using the diagrams, reassemble the metal disks and sliders in the appropriate spots.
- If steel wool was unable to clean the metal sides of the pulsator or the main base, lightly rub them over small-grained sandpaper. A few motions should clean them up.
- Put one side onto the sliders and click it into place. There are two little pins on the base of the pulsator that must line up. Screw the one side in.
- Put the lid back on and insert pin.
-
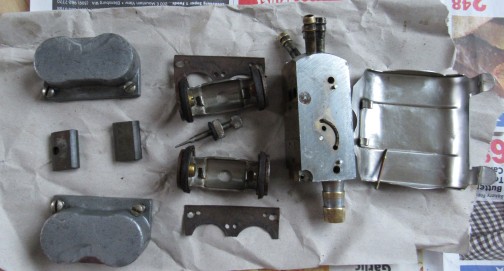
Clean and ready for rebuild After the lid is attached, put on the other side and screw in. If you put both sides on before the lid, you won’t be able to get the lid on! (I’ve done that many times…)
- Close lid of pulsator. There should be a small rubber ring in with the kit. That goes on the lid of the bucket, then the pulsator twists 90 degrees to fit on top. (The C style lid has a round top where the pulsator fits on and DOES NOT take any rubber gasket. It just slides on metal to metal.)


Final touches:
Adjust pin/leather/nut and place slides on alternate sides (one towards left, one towards right). Place a drop of oil on each side of each slide. Place pulsator on machine, place air lines and inflations back onto machine, then plug in to pump, turn on, and adjust as necessary to get correct pulsation.


NOTE on SPEED of PULSATOR: Be sure, before milking time, to plug in the machine and test the pulsator. You will most likely need to adjust the sliders and the needle to get the correct air flow and pulsation rate.
CLICK HERE to view a short video on how fast a pulsator should pulse.
It’s hard to explain in words, but the pulsation should be smooth and one rotation in about “one-one thousand” time. Think of if you were hand milking a cow. Not very fast, right? So be sure not to set your pulsator at lightning speed. Contrary to what some people think (yes, I’ve heard this over and over) a faster pulsation does NOT milk the cow out faster. In fact, it can cause teat end damage and can cause a cow to hold up her milk (stresses her out). Find a pace that works best for you and the cow and try to maintain that speed. Remember, cows like consistency! Also, you can occasionally oil the machine with Surge or sewing machine oil. One drop per hole (open lid and underneath, each slider has a hole in the middle.) means one drop per hole. And maybe once a month or every few months. Do not over oil or your pulsator will get sticky and you’ll have to take it all apart and wipe off each part and dry the leathers in the oven to remove some oil!
For more pictures, check out: https://spiritedrose.wordpress.com/jersey-cattle/how-to-produce-quality-milk/machine-milking/
http://www.dallasdomedairy.com/milkingequipment.php

Troubleshooting:
Question from a reader: (condensed version) “I rebuilt my pulsator. I hooked up my surge milker and the first day I got great suction but no pulsation. Do you have any other tips? I am frustrated because it should work.“
My response:
Yes, that happens quite often. A common cause is if some cotton fuzz gets stuck somewhere from cleaning (like, if you used a q tip or a pipe cleaner…) Spray all the ports with compressed air and see if anything flies out.
Another common cause is that the new leathers are too dry, so you don’t get any suction. Did you oil the leathers when you put them in?
When I say “adjust the sliders” I just mean that when the whole machine is together, you can move the sliding movement (the piece that has a leather on either side) back and forth. Does it move freely, or snugly but easily, or not move easily? You want suction, so you want it to be snug and have a swish sound when you move it back and forth fast. Sometimes, the replacement leathers are a bit narrow and I’ve had success actually flipping them backwards so the “spring” out more once in place inside the pulsator. Also, if you over-oiled the leathers, they will be “gummy” and stick instead of sliding. (To remedy, place leathers on a paper towel for a few minutes in a warm oven.)
Yes, the needle is between the air hose ports. The needle adjusts how much air comes through the pulsator. You should start with it screwed outward (counter clockwise) and somewhat loose, then the pulsator will likely be running too fast and you adjust the leather/nut/& needle inward to get the proper pulsation rate.
Also, I’m not sure which style pulsator you have, but check the “disks” that sit on the pulsator under the leather holding sliders. A common mistake is to put those in flip-flopped, so make sure the bottom side matches the pulsator block base. I have pictures of that on my website, Hamby does too.
Resource:
Does your pulsation system need a check-up?


Total newly, can you please explain the function of the check valve, please? I have heard of someone milking without it in place without any problem, but I know it must have an important function. Thanks, and well done teaching yourself to rebuild these milkers.
LikeLike
Rebuilt my surge pulsator and now it won’t pulse. The back slide is very difficult to slide, and if I move it by hand it will go back to the opposite side but not by it’s self. Anything you can think of that might cause this. We have taken it apart several times (blew air and wiped it off) and even put the old leathers back on it and it still will not work. Any help would be greatly appreciated!
LikeLike
Yes, that’s happened to me quite often. I would try rubbing a light layer of oil on all the sliding metal parts. There’s a fine balance between having not enough, enough, and too much friction between the outer cover and the leathers. I just have to troubleshoot until it works. Sometimes the older pulsators come with a little flexible disc that is by the leather – in addition to the more solid disc. I’ve found that if I remove that, sometimes the pulsator will run better. Also just flexing the leather back and forth a bunch of times to soften it up can help. If the leathers are too oily, you can wipe off excess with a paper towel or put in an oven to cure on a low temp.
If you think the actual main case is plugged, soaking it in a vinegar solution can release grime but then it needs to be dried out really well.
LikeLike
HI there
We have a surge milker that works like a dream once in a while. It has good suction and will pulse if you put t tiny bit of weight on one of the sliders. I called up my old neighbour who used to use one and he said that all they ever did was add a bit of oil to the top of the sliders and that it would work in and all would be good. He was right. Last time. It seemed to do the trick for a while, but now I am back to holding my finger on top of the slider. It seems like if it just has a wee bit of weight on it it will work almost by itself. I am not sure if it is just a bit of weight, or just a bit of a push that the slider closest to the pump/air hose (farthest away from the milk lines) needs. But once it moves, the other one will. The needle for speed adjustment seems to be doing its thing and there is plenty of pressure. We have had it all apart and cleaned out and leather, etc replaced. We are also sure that it was put back together according to your pictures here which are by the way very helpful!
Any ideas for me?
Thanks in advance!!
LikeLike
Have you tried smoothing the bottoms of the sliders? A really fine sandpaper and just a glide or two across it can help level them out.
On rebuild kits, I’ve had issues with the leathers, sometimes they’re not thick enough so I have to do some twisting and stretching to try to open them up a bit so they seal the air better.
LikeLike
Thanks and I will give both of these a try!
LikeLike
I think the sandpaper helped. It is now pulsating and seems to work fine as long as it is not on the cow. As soon as I put it on, it slows down right away and takes forever to get pressure back up. It doesn’t seem to take milk in very fast either. When it is on my cow the needle won’t adjust the speed but it works fine before I put it on. I think maybe this is because the pressure isn’t that great when it is on the cow. If the leathers sealed better would this not happen?
Before I put the cups on I make sure that she is letting her milk down and it is coming. She is a real doll and loves the machine so I don’t think it is her not letting it down. If I milk her by hand there is lots of milk but I think she likes the machine better. All of this being said, it seemed to go a lot better last year!
Thanks again!
LikeLike
This sounds like a pump issue now – either you don’t have a proper size balance tank which holds a reserve of air for times like when you’re putting on the inflations – or maybe too small of motor, wrong measure of vacuum (should be 13.5 Hg give or take one).
LikeLike
I have rebuilt my pulsator and it works as long as my finger is plunging the hole it connects to under the lid. Does this mean my lid isn’t sealing or I don’t have enough suction?
LikeLike
If you put the machine all together, can you push down on the pulsator and get suction so that it takes off and runs? Usually once you get a seal, it’ll hold.
I’m guessing your new rubber parts are a bit stiff and make take some time to break in. If it’s the style of lid that has the rubber seal on the bottom, you might try a different seal or pushing down on the pulsator at the start as I mentioned above.
LikeLike
Thank you for replying so quickly! Yes, it worked for about 2 years before, and only recently stopped pulsing, so I thought I would try the rebuild. Now it fires rightvup and pulses well, but too fast. I can’t say I remember exactly how far in the needle was before, but it definitely was adjustable. Now no matter what I do, the speed is unaffected.
LikeLike
Sure! 🙂 I’d double check the needle, just to make sure nothing stripped on the threads. Have you tried blowing out all the ports/tubes with compressed air? Someone recently mentioned they tried all that and then took it all apart to the base and soaked it in vinegar. Must have been something sticky plugging it up, because it worked after that. Maybe there’s something blocking the needle from going in further. You could try a smidge of oil on the needle to see if it helps it screw in better.
My other thought would be the new leather disks – if they’re too moist or dry. They should be pliable but not oily.
I’m not sure if any of these ideas will help you, sorry. I have had similar problems myself when rebuilding a pulsator and I think it just has to do with all the new parts fitting a little differently.
Oh, and the needles won’t all go in necessarily the same distance on every Surge pulsator – they vary a bit by style, etc. So I wouldn’t judge yours by others but rather just see where it needs to be now. If it’s going all the way in and not slowing down, that’s where I wonder if because the other parts are new and tight, if they’re working too fast. Maybe even a little more friction on the disks that slide back and forth could help slow it down.
LikeLike
Update: I discovered by accident that if I push down really hard on the top of the pulsator, the rate slows waaay down, almost stops. If I let up, it shoots right back up to lightning fast again. Does this give you any ideas on what may be happening? I tried pushing on just the lid to see if it was the big seal ring, but that didn’t change anything. It only works when I put pressure on the pulsator itself, which gets very tiring.
LikeLike
Did you try taking the leather disks off and flexing them? On one rebuild kit, I had to flip them inside out to get it to work.
I’m not sure the difference you mean between pushing on the lid and pushing on the “pulsator” – where are you pushing when you push on the pulsator?
LikeLike
Do you know what type of pulsator will work with the delaval vintage lid….the pulsator that came with it requires electricity and delaval sys it is discontinued
LikeLike
If you can send me a picture of the lid, I may be able to help you. Hard to know without seeing it. Unless you know the name of the exact style.
LikeLike
Hello Sir, I got a old milking machine and I am planning buy a Vaccum Pump. Can you please give me some information on place to find Old Vaccum pumps or any cost saving Idea on Pump selection?
Thanks for your help,
Basha.
LikeLike
I don’t know of any online sources for used pumps, other than Craigslist or your local classifieds. Good luck!
LikeLike
Ebay is a good source
LikeLike
Thank you so much for the fantastic run-down on the Surge milker pulsator! I am trying to put together one of these with the S type lid and was hoping you could help with a couple questions.
1) I need a check valve but the one I found is the new type and indicates it only works on the C type lid. Do you know what the difference is? Do I need to just try and find a used one that is older?
2) I also need a pulsator and was considering getting the Interpuls type, however the adaptor for that also indicates it is only for the C type lid. Is there a different one for S type? I thought most of the parts were fairly inter-changeable, including the pulsator. Do I need a special older type pulsator?
Thank you!
LikeLike
Laura – I’ve found that the check valves vary in size (diameter). The difference may not be very noticeable to the eye, but when you put one in, it should fit snug, if you have the wrong one, it just won’t fit down into the hole at all! That’s a good question and something I should add to our article, I will go home and find out which is bigger, since I have both styles. If you do find a used check valve, don’t worry about the condition of the rubber top. When you buy a rebuild kit ($10-12 online) they now come with a check valve rubber cap. You can peel or cut off the old one and slip the new one on, even though companies will tell you you have to buy their $18 new check valve.
I don’t have an Interpuls (I have heard good things about them, though). My suggestion would be, if you only have an S lid and no other S parts – why not just buy a C type lid on ebay used and then you can get the new check valve and interpuls pulsator? A lid should not be very expensive, and it might make your life a lot easier as far as finding parts now and in the future to fit. Another option would be to look for a S style pulsator and check valve, which if you watch ebay should come available fairly often. Buy a rebuild kit if it’s a used unit (although some are sold as rebuilt already). Ask lots of questions to make sure it’s a working unit that’s in good condition.
LikeLike
I have a “s” surge pulsator that is missing the retaining pin, it pulses fine when we put our palm over the hole in the bottom but we can’t get it to seal on the surge lid. Could the missing retainer pin be all that is wrong?
LikeLike
Are you referring to the large screw on the bottom of the pulsator? If you’re able to get the pulsator to work by covering that, can you seal it with something like duct tape and see if that allows the pulsator to sit on the lid and function?
S pulsators do not have a ring gasket (C pulsators do, it is a little rubber gasket that sits on the lid around the spout that the check valve sits in).
Pulsators can be VERY finicky, if there’s an air leak. So since you have identified the area of the leak, correcting that should correct your problem, if you can get it to sit on the lid sufficiently.
LikeLike
No, it’s not the screw on the bottom (mine doesn’t even have that). I’m talking about the small pin up inside the hole on the bottom that fits in the groove on the lid. I can’t imagine that such a tiny little pin would have anything to do with the leak but we can’t even push hard enough down on the pulsator to make it seal.
LikeLike
I don’t think the pin should make any difference, unless it actually broke out and exposed a hole. If there’s just no pin and it’s smooth with no hole, that should not be your issue. If you also are holding down the pulsator and not getting a seal, then you need to look elsewhere:
1. Does holding down on the lid work (maybe your lid seal is stiff?)
2. When you manually move the slides back and forth (the slides under the lid of the pulsator, which move the metal pieces and leather gaskets back and forth) – is it smooth, is it too loose, or is it stuck? – If loose, you may need to take apart the pulsator and add a little oil to the leathers or physically wiggle the leathers to fluff them back up.
3. If you think there’s too much air leaking in underneath, you could maybe put a piece of wax paper around the hole to “snug” it onto the lid. Maybe there’s too much air leaking in around where that nob should have been.
LikeLike
My pulsator was rebuilt right before I bought it. One day it fell in the dirt and I quickly rinsed it off…..now the pistons are very very slow to slide. Do I need to rebuild the unit or will the drops of oil work?
Thank you!
LikeLike
I would not necessarily suggest a rebuild kit, but if you can take apart the whole pulsator and blow out the holes with compressed air, wipe everything down and make sure the leather parts are clean yet supple. Put it all back together with a drop of oil on each leather if needed. Then give it a try again. You may need to let the leathers sit out to dry for a while, or if you only have one pulsator, you can speed up the drying by putting them in a food dryer or luke-warm oven for a while.
LikeLike
I am having trouble adjusting the pulsation speed. It’s stuck on lightning fast. Turning the needle doesn’t change anything. Any suggestions? Thanks.
LikeLike
On the front of the pulsator is a needle, a nut, and a small leather washer. Have you tried adjusting the nut? Move the needle in/out and do the same to the nut and see if you can find a spot where they fit and slow the pulsation. Also, what does your pressure gauge read? Have you tried adjusting it lower? Optimum pressure for a vacuum pump is 13.5, but that can be adjusted based on how close or far the machine/hoses are from the cow.
LikeLike
This is the problem we are having. Stuck on too fast. I have backed the needle all the way out, twisted it all the way in, adjusted the little leather and nut all the way up and down the needle, and nothing changes the speed up or down. It seems like the needle on your video is in farther than mine, but it won’t twist in any more, even if I back up the nut all the way. Ideas??
Thank you very much for these instructions and help. This page walked me through the rebuild yesterday without a hitch.
LikeLike
Was the pulsator working before you rebuilt it, and were you able to get the needle in further before rebuilding?
LikeLike
I should also add that our suction is only at 10, but it feels stronger than it did before the rebuild. It was becoming uncomfortable on my Palm while we were trying to change the pulsing speed.
Pump is about 8 ft from the cow.
LikeLike
13.5 is the standard amount. Your pump is very close to your machine, so 12 would probably work. 10 sounds low… It could be feeling stronger because the rebuild may have snugged up the areas in contact with leather, allowing less air to escape from those areas. I wouldn’t worry about the pressure being too low, as long as it’s properly milking out the cow.
LikeLike
need information on where to purchase the surge milker gasket for $15.00
LikeLike
Google is a good place to start for whichever dairy supply you are looking for, but personally I’ve always been pleased buying from Hamby Dairy Supply, they have an online store.
LikeLike
So while most cheese aficionados will wrinkle there noses at the mere mention of processed cheeses,
we have now found some very sophisticated uses for them.
I made the switch to goat cheese so more people could enjoy the recipe, but I think I actually like the taste of the goat cheese
even better than the feta cheese. This is my favorite scenic drive
in wa & the road winds through sections of tall trees which create a canopy over the road with filtered, speckled sunlight, entering
through the car windows.
LikeLike
My surge milker has a round pulsator that does not look like the ones on your website. It has a clear plastic top underneath a stainless protective cap that has the surge logo on itl it has four ports. No screws only two push pins. Any thoughts?
LikeLike
There is a new style of pulsator that you can buy that is called a Interpuls. This fits a Surge bucket but is different in every other way to what I’m referencing for the old style stainless. Perhaps yours is similar to this Interpuls.
This link should come up on Surge pulsators from Hamby Dairy Supply: https://hambydairysupply.com/xcart/home.php?cat=256
Do any of yours look like these? If so, you can click on one for rebuild kit information or you can call Hamby directly and they may be able to direct you to replacement parts and rebuild information. You could also try Parts Dept. Online to identify your pulsator.
LikeLike
i started with old pulsators and after several rounds with mastitis and uneven milk-out I went to Parts Department and got a new pulsator and adapter http://www.partsdeptonline.com/4-PORT-PULSATOR-BRK/productinfo/62724/ and have had no more trouble. Solid state – good for 1000 milkings a day for a year – which means that my little Jersey girl will never wear it out. It has pulsation rate preset and the adapter works like a charm.
LikeLike
is there anybody that knows of a diagram like this for de laval pulsators? I cant even find out what kind of oil they take.
LikeLike
The first detailed information I got was when I bought my first rebuild kit. You should call around and see if a company has the rebuild kit instructions to go along with a rebuild kit for your style of DeLaval. Mine was first from Hamby Dairy Supply, that would be a good place to start.
Also, I believe the pulsator oil can be used interchangeably. In a pinch, you can use sewing machine oil. but double check with a company (like Hamby, etc.) that your pulsator even needs oil…. I think some of the newer plastic ones are oil-less.
LikeLike
What do I do if that “Never touch’ fifth screw was out when I got my milker?
LikeLike
Do you have the screw? If so, I would put it back in and try to get it flush with the bottom of the pulsator. Make sure you clean every port really well (compressed air can be helpful). Then put it together and give it a try. That’s all I can suggest for you. If you have a good pulsator, I’d use that as a constant to make sure everything on your machine is working. Then when you switch to the affected pulsator, you will know if it doesn’t work it’s the pulsator and not something else.
LikeLike
I have rebuilt a Surge milker with all Surge bucket, vacuum pump and vacuum reservoir, thanks to your website for tips on rebuilding the pulsator. The owner’s manual for the vacuum pump, which requires one quart of oil to operate, specifies “Surge Piston Pump Oil Only.” Can you advise what type of oil will work safely in the vacuum pump or where to obtain (if possible) the Surge brand oil?
LikeLike
I was able to find “vacuum pump oil” through a dairy store. If you live anywhere near a dairy supply store, they should be able to find it for you. I am not sure if “Surge” brand is available (now Westfalia-Surge), but mine was a generic brand for all dairy vacuum pumps, so I think that’s probably the best I could come by. Mine was $12 for a gallon and was tinted blue for ID. I think you can find it online, but it was more like $30 for that same gallon.
Before I found the pump oil, my dad had used a synthetic motor oil and that worked just fine for the pump as well.
LikeLike
Also I found vacuum pump oil at the auto parts store….$16 a quart!
LikeLike
You’ll probably only need a quart and it’ll last forever if you take care of your pump.
We got lucky and bought ours in PA at a dairy store….a gallon for less than what they want for your quart. Just depends how much time you want to spend in looking for a cheaper deal!
LikeLike
How do u know if u have the right lid for the bucket
LikeLike
The lids should be fairly universally accepted for any surge bucket. The only big concern with lids is matching up the correct pulsator with the correct lid (a wrong match will not fit at all). If the lid is not original to the bucket, it should still work fine. You can also check other styles of lids (say, DeLaval) and see if they work. The two things to watch for are this: 1. Make sure you have a good rubber seal underneath the lid, as suction is the most important part. 2. The bucket needs to build up pressure, so the lid needs to match/touch the gasket in order to seal.
I use one style of bucket with another style of lid and it fits slightly loose (I can wiggle the lid and it moves slightly over the bucket when there’s no pressure) but I know it works, because it gets a good seal. Once the pump is on and the pulsator is working, you can check the seal by lifting the lid. The lid should not budge then.
LikeLike
I am just starting to milk my small dairy goat herd with a surge bucket- I am missing the pulsator and was trying to figure out which one I needed. Thanks for the help- your website is awesome!!!!!!!!
LikeLike
HOORA! i got it to work without the rebuild kit, i fallowed your instructions but had to use WD40 to get the leather gaskets to slide the thing was dirty as hell inside so i used some Qtips and some pipe cleaners like you suggested my only advise to anyone else that tries this is use a terry shop towel over the paper as it helps keep the little pieces from rolling or sliding around. So the only thing i need now is the check valve tip so one major hurdle overcome thank you S.R.D.
T.a.K
LikeLike
You can get new tips separate, but they are included in the rebuild kits now (and probably much cheaper).
If you have an old style check valve, you CAN use the new tips, just peel off the old one (may take some elbow grease) and pop the new one on! 🙂
Glad you got it working. Yes, paper (or cotton) fluff can cause more problems than solutions. LOL
LikeLike
Hello what should i do if the pulsator i was given was already disassembled and the screw you shall NOT touch was already removed (for cleaning is what i was told) can it be repaired?
Thanks in advance
Tricia
LikeLike
Can you put it back in place? I would try to reassemble everything (this will require buying a NEW rebuild kit at $10 online) and see if it works. Make sure you have all the parts in the right spots and that all the air ports are very clean. If it doesn’t work after putting it together, take it back apart and blow compressed air through all the holes and check for gunk that may have come out and plugged it up. Then reassemble and try again.
I think you should be able to get it working and may just take some adjustment. Definitely worth trying as buying a rebuilt pulsator is probably $90! So worth the $10 investment (and if it doesn’t work, you can always take back off the rebuild kit parts to use on another machine, so no money lost there. Good luck! Let me know how it turns out for you, okay!?
LikeLike
I’m thinking about getting a milking machine. The surges seem cheaper and plentiful, but I don’t have any experience with them (or any other machine). Will the rebuild kit work on any of the surge pulsators? Should any surge pulsator be “fixable” with the rebuild kit? Thanks for your help…
Janice
LikeLike
Janice,
I believe the Surge rebuild kit works with all the surge pulsators. I have two different styles and the rebuild kit worked fine on both. As long as you have ALL the parts, my belief so far is that YES, you can rebuild any Surge pulsator. My first ones came in really dirty, gooey, and gunky and they all re-built like new. The parts are stainless for the most part and heavy duty. The only one I didn’t fix up was an old “Farm Master” I don’t even know what that was…but it was on one of the Surge-style buckets.
Think of a Surge as a short, squatty bucket with a long handle. Think of a DeLaval as a tall narrower bucket. Surge milk out a cow much better, but you can adjust a DeLaval (or similar bucket) with weights to get a similar effect. I’d say if you can find one cheap, a DeLaval is probably more versatile. But if you just need something to milk a cow, a Surge works fine. I’m partial to the Surge because that’s what I learned on. 🙂 A Surge holds up to 4 gallons. A DeLaval holds 5-8 gallons, so can be much bigger/heavier!
LikeLike
Note, though, if you’re putting together a bucket from parts, make sure the style of pulsator fits the style of lid.
LikeLike